How To Do Abhyanga: A Practical, Mess-Free Guide to Āyurvedic Self-Massage
With so many benefits, it's clear that self-massage is well worth a try. So how exactly can you perform Abhyanga? Keep reading to find out.
With so many benefits, it's clear that self-massage is well worth a try. So how exactly can you perform Abhyanga? Keep reading to find out.
In this post, we'll look at:
- How to practice warm-oil self-massage (mess-free)
- Essential Abhyanga tips
- Incorporating Abhyanga into your life with ease
How To Perform Abhyanga (Minus The Mess)
Okay, so you're ready to take the plunge. That's fantastic.
It may feel weird at first. But honestly, it's easier than you think.
While traditionally, Abhyanga is performed in the morning, it doesn't have to be a standalone ritual sitting between you and the rest of your day. In fact, doing it just before your gym session or yoga practice is very much in keeping with traditional Āyurvedic guidance — apply a thin layer of oil, wipe off any excess with a towel, put on your gym clothes, and let the heat and movement of your workout drive the oil deeper into the tissues. The warm shower you take afterwards does the rest, opening the pores and enhancing absorption further.
If you have a little more time on a morning, applying oil and then spending 10–15 minutes in warm sunlight before your shower is traditionally understood to support both absorption and vitamin D synthesis — the skin needs both fats and sunlight to produce vitamin D, and having oil on the skin while exposing yourself to gentle warmth supports this process. This works best when the sun actually feels warm. In cold weather or harsh wind, step back inside — exposing an oiled body to cold air runs counter to the whole purpose of Abhyanga, which is to warm, nourish, and settle, not to invite a chill.
If mornings don't work at all, 2-3 hours before bedtime is equally fine. The one consistent rule across all timings: always on an empty stomach.
To Prepare
- Pour about 50-100ml of oil into a glass/steel bowl. The right amount varies person to person, so use this as a starting point and see what works for you.
- Heat the oil by placing the bowl in a pan of hot water, or use a small electric baby bottle warmer or cosmetic bain marie.
- Lay an old towel on the floor in a comfortably warm room/bathroom. Keep a small towel nearby.
- Have an old pair of socks and clothes you don't mind getting oily on hand, if you'd prefer not to wait naked for the oil to absorb.
- Bring the heated oil in and begin.
How To Do Abhyanga (5-10 minutes)
Stand or sit on the towel you laid down. Take some oil into your palms and massage it all over your body, working through each area in turn.
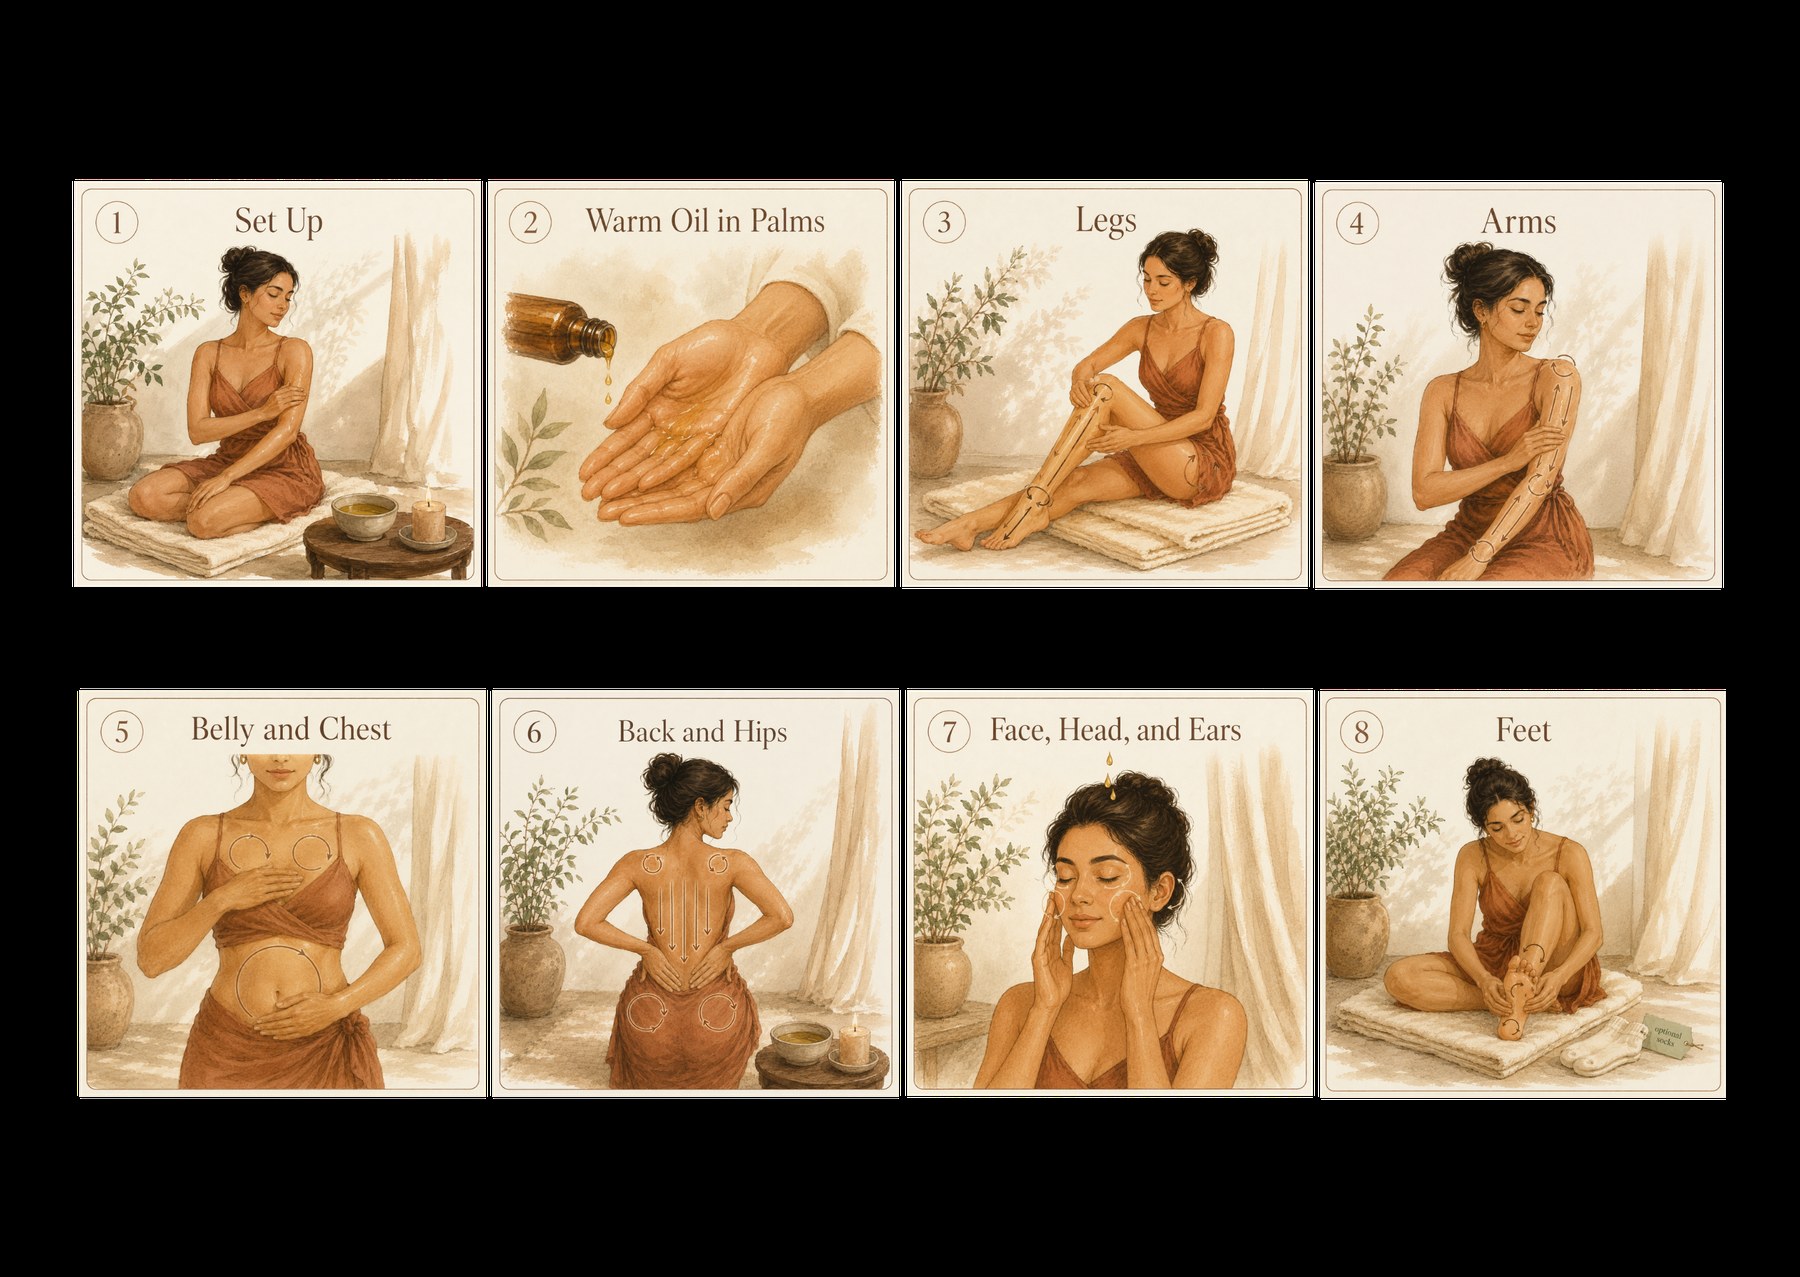
Legs. Long strokes up and down the full length of each leg, always finishing with a downward stroke. Circular motion on all joints — ankles, knees, hips.
Belly. Clockwise circular motion, following the path of digestion — up the right side, across, down the left.
Pelvic area, inner thighs & groin.
Lower back & hips. Long downward strokes on the lower back, always finishing downward. Circular motion on the hips.
Chest & breasts. Circular motion.
Upper back & shoulders. Apply oil to all areas you can reach, finishing with downward strokes. Pay particular attention to the trapezius — the broad muscle running across the top of your shoulders and up into the neck. If you can, ask someone to help with the areas you can't reach.
Arms. Long strokes up and down the full length of each arm, always finishing with a downward stroke. Circular motion on all joints — wrists, elbows, shoulders.
Neck. Long firm strokes, always finishing downward.
Face. Circular motion around the eyes, cheeks, and ears. Massage inside ears with pinky finger.
Head. A few drops on the crown (optional). If you feel like it, work the oil across the full scalp with your fingertips.
Navel. A few drops of oil placed directly in the navel and massaged in.
Feet. Finish with the soles of your feet: heels, arch, and between the toes. Pop on old socks immediately after to avoid slipping.
After the massage
Give your skin time to absorb the oil. 10-20 minutes, depending on how much time you have available.
Then, enjoy a nice warm shower. This will further open up your pores, allowing the oil's nutrients to seep in. Avoid using too much soap. Leaving a little residual oil is extra nourishing.
Heading to the gym or a yoga class instead of waiting for absorption? Wipe off the excess oil with your towel, get into your kit, and head to your session. The heat and movement of your practice will carry the oil deeper into the tissues, and your warm shower afterwards will take care of the rest.
To Avoid An Oily Mess
- After the massage wash your hands with warm water, using a little soap if required. So that your hands are oil free before you touch anything.
- Have a set of towels just for Abhyanga. Those fancy, luxury ones won't appreciate the oil treatment 😉. Also, wash your Abhyanga towels separately, using hot water to remove the residual oil.
- Use hot water to wash down your shower or bathtub. And while you're at it, pour some dishwashing liquid down the drain, too, to avoid oil build-up in your plumbing.
It may sound a bit too cumbersome if you've never tried Abhyanga before. Before you dismiss it entirely, however, I encourage you to give it a go. Yes, there is a little bit of effort involved. But even a bubble bath means greasing up the tub and then cleaning up after. It's worth it in the end, though, right?
On that note, here are my recommendations on getting the most out of your self-massage, especially if you're attempting it for the first time.
Key Abhyanga Tips For First-Timers
Choose The Right Oil
Sesame oil is the traditional choice in Āyurveda, and for good reason. Untoasted, cold-pressed sesame oil is warming, deeply penetrating, and works well for most people across all three constitutional types. It's also the most studied of the Āyurvedic massage oils, with research suggesting it supports circulation, skin integrity, and the movement of waste through the lymphatic system. If you're new to Abhyanga and not sure where to start, sesame oil is your answer.
That said, it doesn't suit everyone. If you find sesame too heating, react to it, or have a sesame allergy, there are good alternatives. Coconut oil is lighter and naturally cooling, which makes it a good option in warmer months or if you tend to run hot. Sweet almond oil is gentle, neutral, and well-tolerated by most skin types. Neither of these is a compromise, they're simply different tools.
One thing worth knowing: traditional Āyurveda doesn't use neat essential oils in massage. What it uses instead are medicated herbal oils: base carrier oils that have been processed with whole herbs, pastes, and sometimes milk over many days of slow preparation. The result is an oil that carries the medicinal properties of the plants deep into the tissues. Modern research is beginning to validate this approach, showing that fat-soluble compounds from herbs do penetrate the skin and reach the bloodstream. If you'd like to use a medicated herbal oil rather than a plain carrier oil, look for one prepared in the traditional way, not a carrier oil with essential oils added in. The two are very different things.
Use Warm, Not Hot Oil
You don't want to burn your skin or cook the oil. It should be soothingly warm to the touch. Fun fact: warm oil is better for skin penetration and absorption.
Like with the type, the best temperature for your oil will depend on your constitution. Vāta-dominant individuals will prefer warmer temperatures than those with a high Pitta. Meanwhile, Kapha-dominant individuals will need less oil than other dosha types.
When To Skip Abhyanga
While the amazing results of oil-massage can be hard to resist, there are times when it's best to be avoided. Āyurvedic advice is to forgo Abhyanga when you:
- Are suffering from vitiation of the Kapha dosha
- Have an acute fever, a cough, cold, flu or chills
- Are fasting
- Are menstruating
- Have a low Agni (digestive fire)
- Are severely exhausted, have high sun exposure or have participated in strenuous exercise (eg. a marathon)
- Have just eaten or after Panchakarma (your Āyurvedic practitioner will confirm if you should do abhyanga or not)
- Have wounds or skin issues like inflammation or rashes
- Are pregnant, particularly during the first trimester (check with your Āyurvedic practitioner)
Don't Rush, Enjoy The Process
Bottom line, this is you-time. The 5–15 minutes you spend on Abhyanga are for YOUR health, YOUR well-being, YOUR peace of mind. I've bolded and italicised for a reason. YOU are the only being that matters in the moment. So:
- put your phone on silent,
- close the door,
- light a candle,
- play some music,
- switch off from the world.
Embrace this sensual experience. Breathe in the aroma of the oil. Feel each loving stroke as you massage away the tension and invite in wellness.
You have enough tasks that require speed and efficiency. This is not one of them. Enjoy the opportunity to slow down, to have a singular focus and re-centre yourself.
Keep your movements strong to relax your muscles and relish the sensation. Be sure to maintain a relative level of briskness to generate additional heat. This will help the oil penetrate deeper and allow you to luxuriate in nourishment.

Not sure if Abhyanga is right for you, or where to slot it into your week? In my mentorship, we work with practices like this in the context of your real life, not as an add-on but as part of the rhythm we're already building. If that sounds like what you're looking for, an orientation call is a good place to start.